Vue2状态管理 & Vuex总结
多组件下 共享状态 的解决方案
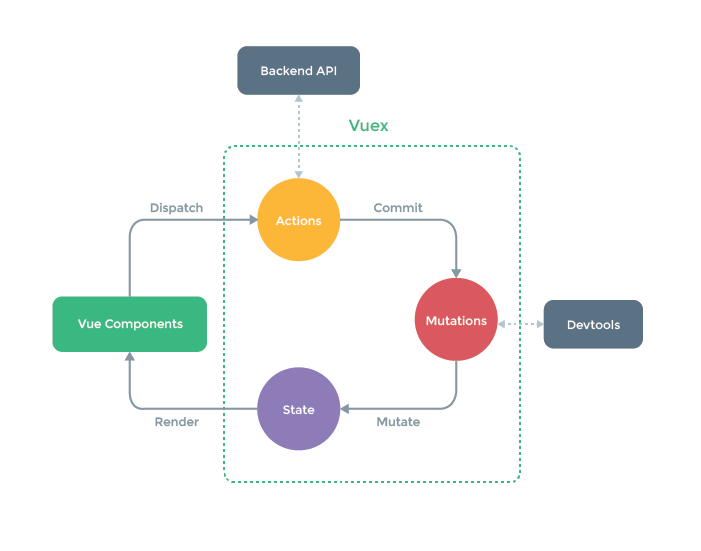
Vue状态管理 & Vuex
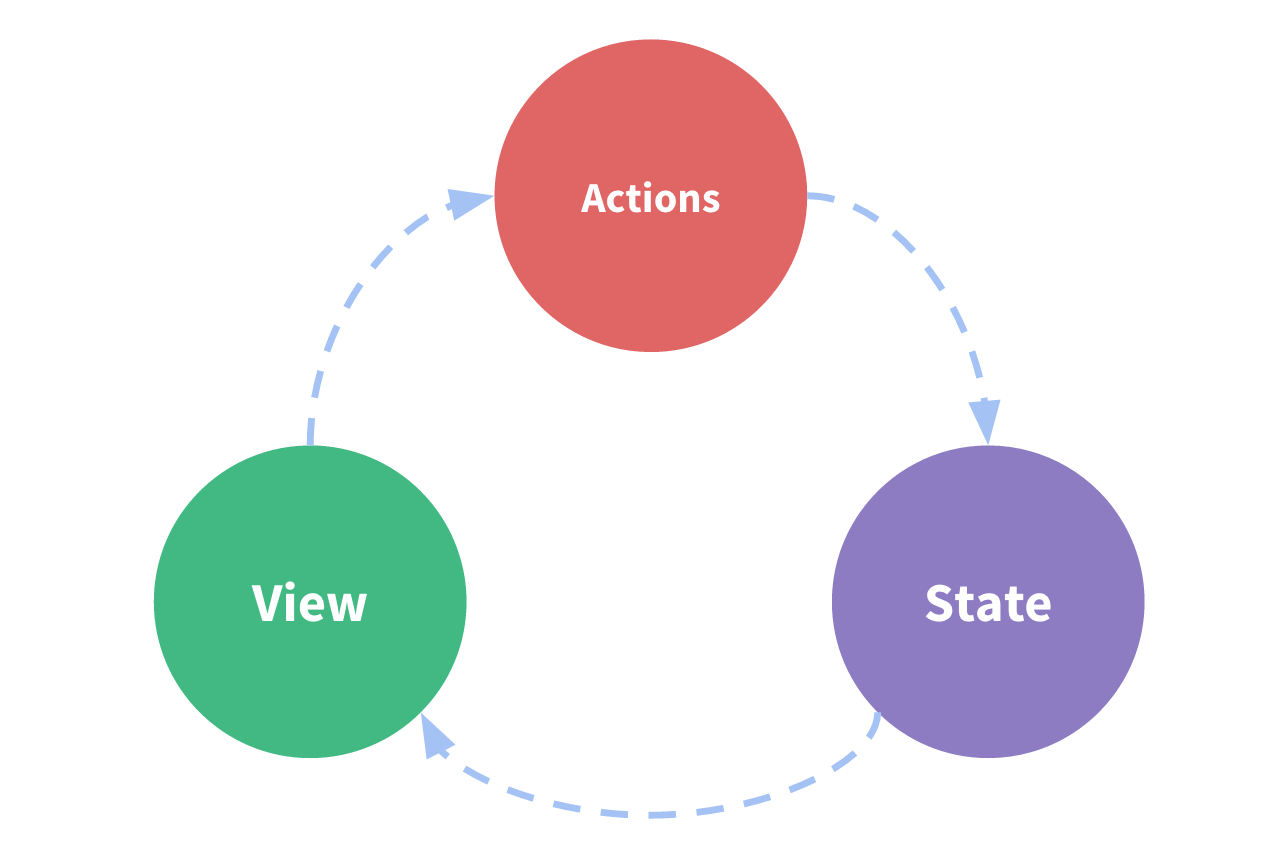
单向数据流
- **state:**驱动应用的数据源;
- **view:**以声明方式将 state 映射到视图;
- **actions:**响应在 view 上的用户输入导致的state变化。
多组件共享状态的需求:
- 多个视图依赖于同一状态:传参的方法对于多层嵌套的组件将会非常繁琐,并且对于兄弟组件间的状态传递无能为力
- 来自不同视图的行为需要变更同一状态:父子组件直接引用或者通过事件来变更和同步状态的多份拷贝。以上的这些模式非常脆弱,通常会导致无法维护的代码
(共享状态,不仅仅是多组件读取同一状态,也包含多组件变更同一状态)
基于state的简单状态管理
- 在vue实例外的作用域,定义一个state对象,作为共享状态
let publicState = {};
let vm1 = new Vue({
  name: "vm1",
  data: publicState,
});
let vm2 = new Vue({
  name: "vm2",
  data: publicState,
});- 简单的store模式
let store = {
  state: {
    a: "",
  },
  setStateA() {},
  clearStateA() {},
};

//把store.state放在vue实例的data里

let vm1 = new Vue({
  name: "vm1",
  data: {
    privateState: {}, //组件的私有状态
    publicState: store.state, //实例外的共有状态
  },
});

let vm2 = new Vue({
  name: "vm2",
  data: {
    privateState: {},
    publicState: store.state,
  },
});
组件们可以共享store中的状态,也可以通过actions变更状态
因为共享状态放在组件的data里,store变化也会驱动组件view变更
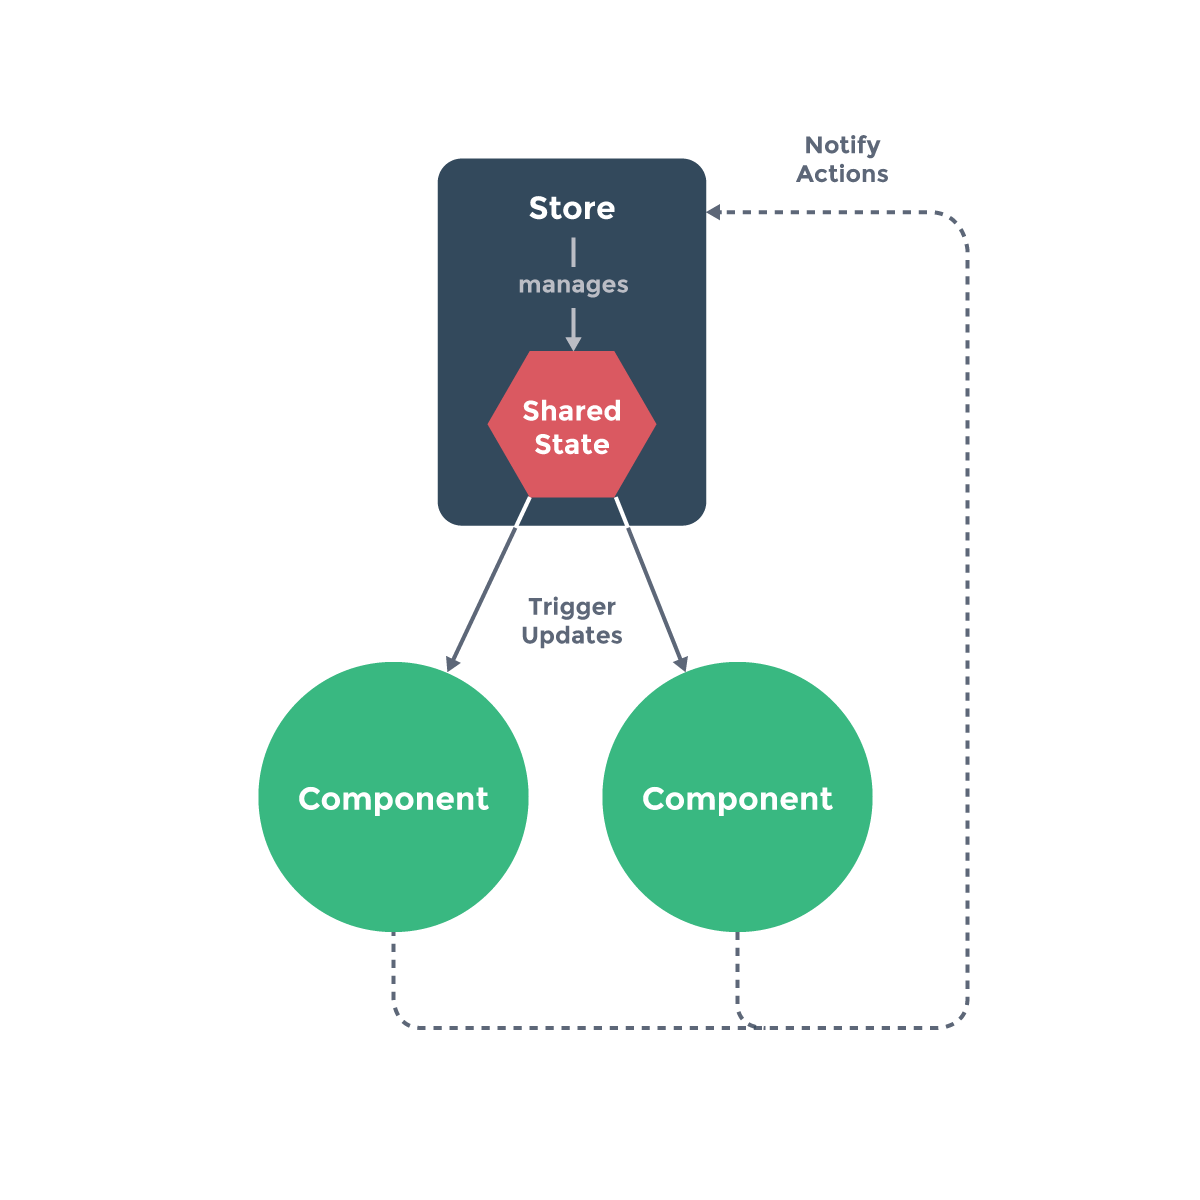
Vuex基本思想
把组件的共享状态抽取出来,以一个全局单例模式管理
在这种模式下,我们的组件树构成了一个巨大的“视图”,不管在树的哪个位置,任何组件都能获取状态或者触发行为
通过定义和隔离状态管理中的各种概念并通过强制规则维持视图和状态间的独立性,我们的代码将会变得更结构化且易维护。
Vuex的使用&子组件注入
src/store/index.js
import Vue from "vue";
import Vuex from "vuex";

Vue.use(Vuex);

export default new Vuex.Store({
  state: {
    count: 0,
  },
  mutations: {
    increment(state) {
      state.count++;
    },
    decrement(state) {
      state.count--;
    },
  },
});
/src/main.js
import Vue from "vue";
import store from "@/store";
import router from "@/router";
import App from "@/App";

// store作为选项传入根组件,是将$store注入所有子组件
// 子组件都可以通过this.$store访问全局store

// eslint-disable-next-line no-new
new Vue({
  el: "#app",
  store,
  router,
  render: (h) => h(App),
});
Vuex的核心思想一:state
Vuex 使用单一状态树——用一个对象(store)就包含了全部的应用层级状态。
至此它便作为一个“唯一数据源 (SSOT)”而存在。
这也意味着,每个应用将仅仅包含一个 store 实例。
单一状态树让我们能够直接地定位任一特定的状态片段,在调试的过程中也能轻易地取得整个当前应用状态的快照。
子组件获取state & mapState辅助函数
/src/page/home.vue
 <template>
  <div id="home">
    <div>count:{{count}}</div>
    <div>count1:{{count1}}</div>
    <div>count3:{{count3}}</div>
    <div>count4:{{count4}}</div>
    <div>count5:{{count5}}</div>
    <button @click="increment">+</button>
    <button @click="decrement">-</button>
  </div>
</template>

<script>
import { mapState } from 'vuex'
export default {
  name: 'home',
  data () {
    return {
      message: 'hello',
      localCount: 1
    }
  },
  computed: {
    // 方式1:直接从Vue原型链上获取$store
    count1 () {
      return this.$store.state.count
    },
    // 方式2:mapState方法传状态名数组
    ...mapState(['count']),
    ...mapState({
      // 方式3:mapState传对象,键为状态别名,值为状态名
      count3: 'count',
      // 方式4:mapState传对象,键为getter函数,参数是state,值为箭头函数
      count4: state => state.count,
      // 方式5:mapState传对象,键为getter函数,参数是state,值为普通函数(因为要再函数体内用this)
      count5 (state) {
        return this.localCount + state.count
      }
    })
  },
  methods: {
    increment () {
      this.$store.commit('increment')
    },
    decrement () {
      this.$store.commit('decrement')
    }
  }
}
</script>
Vuex核心思想二:getter
派生状态
类似于vue组件的计算属性,可以从store的state中派生出一些状态
export default new Vuex.Store({
  state: {
    todos: [
      { id: 1, desc: "test1", done: false },
      { id: 2, desc: "test2", done: true },
      { id: 3, desc: "test3", done: false },
    ],
  },
  getters: {
    //getter中可以接受其他getter作为参数
    maxTodoId(state, getters) {
      return state.todos.sort((a, b) => {
        return b.id - a.id;
      })[0].id;
    },
    doneTodoCount(state) {
      return state.todos.filter((todo) => todo.done === true).length;
    },
  },
});
通过this.$store.state.getters属性 / mapGetters访问派生状态
computed: {
  ...mapGetters(['doneTodoCount']),
  doneTodoCount2 () {
    return this.$store.getters.doneTodoCount
  }
},
getter传参:让getter返回函数
getters: {
  getTodoBySearch: (state) => (s) => {
    return state.todos.filter((todo) => {
      return (todo.id + todo.desc).indexOf(s) >= 0;
    });
  };
}
Vuex核心思想三:mutation
提交mutation
组件不能直接更改Vuex store中的状态,而是要提交(commit)变更(mutations)
export default {
  name: "home",
  data() {
    return {};
  },
  methods: {
    addTodo(e) {
      if (e.keyCode === 13 && this.model.desc) {
        this.$store.commit("addTodo", this.model.desc);
        this.model.desc = "";
      }
    },
  },
};其中addTodo就是在store的mutation中定义的一种变更:
mutations: {
  addTodo (state, desc) {
    const maxTodoId = state.todos.sort((a, b) => { return b.id - a.id })[0].id
    const todo = {
      desc,
      id: maxTodoId + 1,
      done: false
    }
    state.todos.push(todo)
  }
}
提交载荷(Payload)
可以向 store.commit 传入额外的参数,即 mutation 的 载荷(payload):
// src/store/index.js
mutations: {
  increment (state, payload) {

  }
}

// src/page/home.vue
let payload={a:1,b:2}
store.commit('increment', payload)
Mutation 需遵守 Vue 的响应规则
Vuex 的 store 中的状态是响应式的,
当我们变更状态时,
监视状态的 Vue 组件也会自动更新,
因此 Vuex 中的 mutation 也需要与使用 Vue 一样遵守一些注意事项
-
最好提前在你的 store 中初始化好所有所需属性。
-
当需要在对象上添加新属性时,应该
- 使用
Vue.set(obj, 'newProp', 123) - 以新对象替换老对象。例如,利用**对象展开运算符**:
state.obj = { ...state.obj, newProp: 123 }; - 使用
使用常量替代 Mutation 事件类型
// mutation-types.js
export const SOME_MUTATION = 'SOME_MUTATION'

// store.js
import Vuex from 'vuex'
import { SOME_MUTATION } from './mutation-types'

const store = new Vuex.Store({
  state: { ... },
  mutations: {
    // 我们可以使用 ES2015 风格的计算属性命名功能来使用一个常量作为函数名
    [SOME_MUTATION] (state) {
      // mutate state
    }
  }
})
Mutation 必须是同步函数
devtools捕捉会mutations记录,每次记录前一状态+后一状态的快照
如果mutation里是异步的函数,很可能快照捕捉时,状态还未更改
在回调函数中进行的状态的改变都是不可追踪的
因此很不利于调试
Vuex核心思想四:Action
Action与Mutation类似,不同点:
- Action 提交(commit)的是 mutation,而不是直接变更状态。
- Action 可以包含任意异步操作。
action函数的定义
//...
actions: {
  addTodo (context) {
    // 可以通过context参数去调用commit,获取state和getters
    // context区别于state(module中会讲到
    setTimeout(() => {
      context.commit('addTodo')
      // context.state
      // context.getters
    }, 1000)
  },
  addTodo2 ({ commit, state, getters }) {
    // 也可以直接用参数解构的方法获取commit,state,getters
    setTimeout(() => {
      commit('addTodo')
    }, 1000)
  }
}
//...
组件分发action(可以带载荷/参数
methods: {
  addTodo (e) {
    this.$store.dispatch('addTodo', payload)
    this.$store.dispatch({
      type: 'addTodo',
      ...payload
    })
  }
}

//action接收payload参数
//action内部也可以dispatch其他action
actions: {
  addTodo2 ({ commit, state, getters, dispatch }, payload) {
    // 也可以直接用参数解构的方法获取commit,state,getters
    setTimeout(() => {
      commit('addTodo')
			//dispatch
    }, 1000)
  }
}
组合action
- action可以返回一个promise函数
actions: {
  actionA ({ commit }) {
    return new Promise((resolve, reject) => {
      setTimeout(() => {
        commit('someMutation')
        resolve()
      }, 1000)
    })
  }
}- dispatch可以处理action返回的promise,并仍然返回promise
store.dispatch("actionA").then(() => {
  // ...
});- 利用await/async编写组合action更加简洁
// 假设 getData() 和 getOtherData() 返回的是 Promise

actions: {
  async actionA ({ commit }) {
    commit('gotData', await getData())
  },
  async actionB ({ commit, dispatch }) {
    await dispatch('actionA')
    commit('gotOtherData', await getOtherData())
  }
}
Vuex核心思想五:Module
当应用较复杂时,应用所有状态集中在一个(store)对象上很臃肿
因此Vuex允许将store按模块来划分,
每个store拥有自己的state、getter、mutations、actions、子模块
// src/store/module/moduleA.js
export default {
  state: {},
  getter: {},
  mutations: {},
  actions: {}
}

// src/store/index.js
import Vue from 'vue'
import Vuex from 'vuex'
import moduleA from 'module/moduleA'

Vue.use(Vuex)

export default new Vuex.Store({
  modules: {
    a: moduleA
  },
	...
})
模块内的局部状态state(getter mutation action获取state
对于模块内的getter、mutation函数:
接收的第一个参数:state,指向的是模块内的局部状态
getter函数接收的第三个参数是根节点状态:rootState
对于模块内的action函数:
context.state指向的也是模块的局部状态,根节点的状态为context.rootState
全局命名空间(组件获取getter mutation action
默认情况:模块内部的 action、mutation 和 getter 是注册在全局命名空间的——这样使得多个模块能够对同一 mutation 或 action 作出响应。
带命名空间的模块
如果希望你的模块具有更高的封装度和复用性,你可以通过添加 namespaced: true 的方式使其成为带命名空间的模块。
const store = new Vuex.Store({
  modules: {
    account: {
      namespaced: true,

      // 模块内容(module assets)
      state: { ... }, // 模块内的状态已经是嵌套的了,使用 `namespaced` 属性不会对其产生影响
      getters: {
        isAdmin () { ... } // -> getters['account/isAdmin']
      },
      actions: {
        login () { ... } // -> dispatch('account/login')
      },
      mutations: {
        login () { ... } // -> commit('account/login')
      },

      // 嵌套模块
      modules: {
        // 没加namespaced属性,所以继承父模块的命名空间
        myPage: {
          state: { ... },
          getters: {
            profile () { ... } // -> getters['account/profile']
          }
        },

        // 进一步嵌套命名空间
        posts: {
          namespaced: true,

          state: { ... },
          getters: {
            popular () { ... } // -> getters['account/posts/popular']
          }
        }
      }
    }
  }
})
启用了命名空间的 getter 和 action 会收到局部化的 getter,dispatch 和 commit。
换言之,在使用模块内容(module assets,即指模块内的state、getter、mutation、action)时不需要在同一模块内额外添加空间名前缀。
所以:更改 namespaced 属性后不需要修改模块内的代码
带命名空间的模块内访问全局内容(Global Assets)
Global Assets即全局的state,getter,mutation,action
- getter的第三、第四参数:rootState、rootGetters
- action的context参数包含:rootState、rootGetters
- 全局commit、dispatch:传入参数root:true
带命名空间的模块注册全局 action
传入root选项,值为true
...
someAction:{
	root:true,
	handler:()=>{}
}
...
mapState, mapGetters, mapActions 和 mapMutations操作命名空间:
// 方法一:直接在状态名前加命名空间
computed: {
  ...mapState({
    a: state => state.some.nested.module.a,
    b: state => state.some.nested.module.b
  })
},
methods: {
  ...mapActions([
    'some/nested/module/foo', // -> this['some/nested/module/foo']()
    'some/nested/module/bar' // -> this['some/nested/module/bar']()
  ])
}

// 方法二:也可以把共有的命名空间传给函数第一个参数
computed: {
  ...mapState('some/nested/module', {
    a: state => state.a,
    b: state => state.b
  })
},
methods: {
  ...mapActions('some/nested/module', [
    'foo', // -> this.foo()
    'bar' // -> this.bar()
  ])
}

//方法三:利用createNamespacedHelpers,传入命名空间,会返回已经绑定命名空间的map方法
import { createNamespacedHelpers } from 'vuex'

const { mapState, mapActions } = createNamespacedHelpers('some/nested/module')
动态注册模块
在store已经实例化后,如果想添加模块,可以用registerModule方法
import Vuex from "vuex";

const store = new Vuex.Store({
  /* 选项 */
});

// 注册模块 `myModule`
store.registerModule("myModule", {
  // ...
});
// 注册嵌套模块 `nested/myModule`
store.registerModule(["nested", "myModule"], {
  // ...
});
卸载动态模块:unregisterModule(不能卸载静态模块
判断模块是否存在:hasModule
纯对象state&函数声明state
纯对象state可以通过引用被访问,造成状态对象被修改时 store 或模块间数据互相污染的问题。
因此可以和vue组件内的data一样,使用函数来声明state:
const MyReusableModule = {
  state() {
    return {
      foo: "bar",
    };
  },
  // mutation, action 和 getter 等等...
};
严格模式
在非生产环境开启严格模式,在任何尝试不通过mutation直接修改state的操作时,都会抛出错误
v-model & Vuex的state
v-model直接绑定Vuex上的state,在严格模式下会报错,因为双向绑定的机制会直接尝试修改state,而不是通过mutation,解决方法是,绑定一个设置了getter和setter的计算属性:
...
computed:{
	attr:{
		getter(){
			return this.$store.state.attr
		},
		setter(val){
			this.$store.commit('updateAttr',val)
		}
	}
}