ML10 | 训练卷积神经网络 识别手写数字
Javascript玩转机器学习10
加载MNIST数据集
-
MNIST:巨大的训练集雪碧图,以手写数字图片组成
-
资源文件位置
/js-ml-code/data/mnist
  mnist_images.png
mnist_labels_uint8- 给资源文件建立服务器供解析脚本访问
hs data --cors其中—cors表示允许跨域访问
- 加载20组数据
import * as tf from "@tensorflow/tfjs";
import * as tfvis from "@tensorflow/tfjs-vis";
import { MnistData } from "./data";

window.onload = async () => {
  const data = new MnistData();
  await data.load(); //加载资源
  const examples = data.nextTestBatch(20); //获取20组验证集数据
  console.log(examples);
};-
打印出的examples:

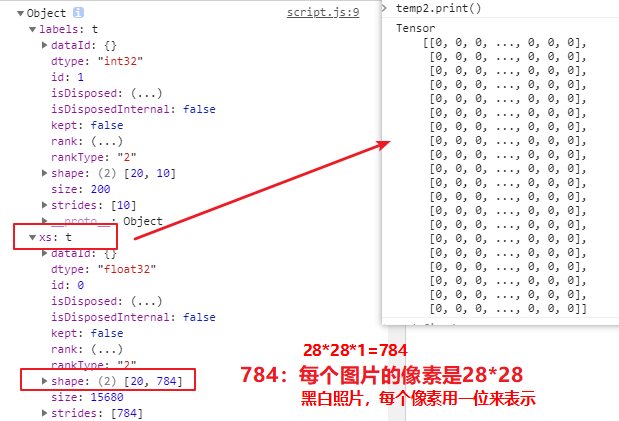
-
tensorflow的splice api

-
用tensorflow的api和canvas显示出20组图片
const surface = tfvis.visor().surface({ name: "输入示例" });
for (let i = 0; i < 20; i += 1) {
  //截取出单个图片:从第1维的第i项+第二维的第1项开始截取,第一维截取长度是1,第二维截取长度是784
  //console.log(examples.xs.slice([i, 0], [1, 784]))

  //tf.tidy:用于优化webGl内存,防止tensor数据量过大导致内存泄漏

  //tf.browser.toPixels:转换成浏览器能识别的像素格式,传入二位参数就是黑白图片,三维就是彩色的

  //tensor.reshape:tensor格式转换
  const imageTensor = tf.tidy(() => {
    return examples.xs.slice([i, 0], [1, 784]).reshape([28, 28, 1]); //将一维数组转换成三维黑白图片格式
  });

  const canvas = document.createElement("canvas");
  canvas.width = 28;
  canvas.height = 28;
  canvas.style = "margin: 4px";
  await tf.browser.toPixels(imageTensor, canvas);
  surface.drawArea.appendChild(canvas);
}- 显示效果:

卷积神经网络
为什么要用卷积神经网络
- 图片数据量大,运算量大,例如一个200*200像素的彩色图片:200*200*3=120,000
- 卷积神经网络能模拟人类的视觉处理流程,高效提取特征
卷积神经网络的结构
卷积层
- image kernels网站了解图像卷积核
- 图像卷积核是一个小的矩阵,用于施加一些效果,例如在Photoshop中可能会看到的效果,例如模糊,锐化,勾勒出轮廓或压花。它们还用于机器学习中的“特征提取”,这是一种确定图像最重要部分的技术。在这种情况下,该过程通常被称为“卷积”
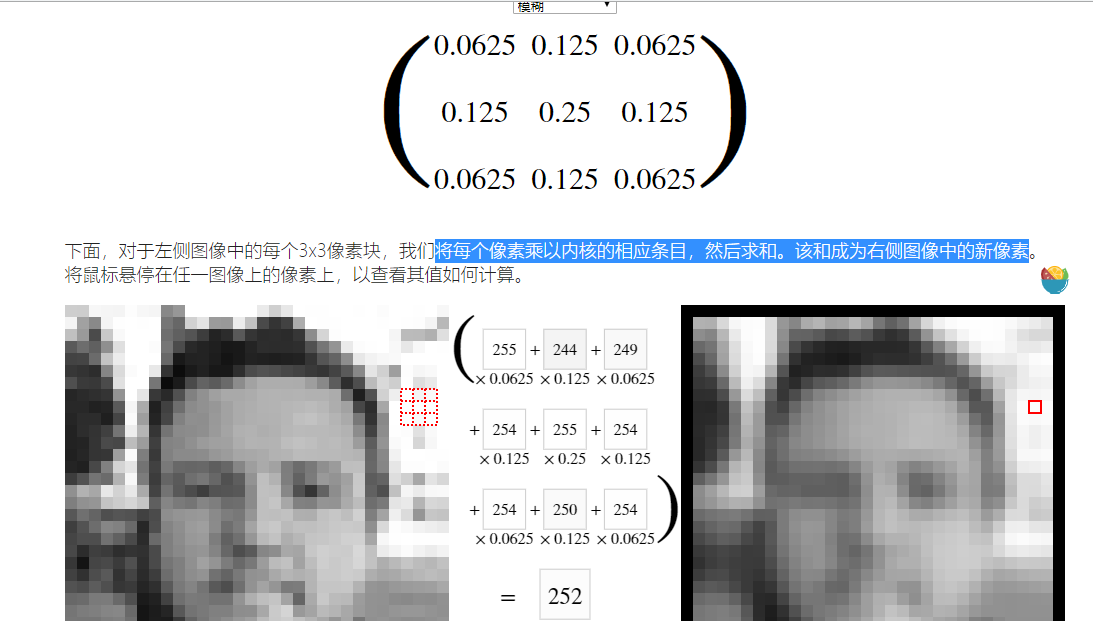
- 图片上的3X3的小矩阵,就是用于卷积以提取图像特征的图像卷积核
- 使用多个卷积核(filter/kernel)对图像进行卷积操作,提取多种特征并组合
- 卷积层有权重,需要训练,其权重就是卷积核
池化层
- 优化层
- 最大池化层用于提取最强的特征
- 扩大感受视野,减少计算量
- 池化层是固定的,不需要训练
dense全链接层
- 作为输出层
- 作为分类器
- 有权重,需要训练
构建卷积神经网络代码
const model = tf.sequential();
//添加一个二位卷积层
model.add(
  tf.layers.conv2d({
    inputShape: [28, 28, 1],
    kernelSize: 5, //卷积核的大小是5X5的矩阵
    filters: 8, //应用8种图像卷积核
    strides: 1, //移动步长,每一个像素单元都进行卷积操作
    activation: "relu", //激活函数,移除掉无用的特征(特征<0就废弃
    kernelInitializer: "varianceScaling", //可以不设置,设置了可以加快收敛速度
  }),
);

//最大池化层
model.add(
  tf.layers.maxPool2d({
    poolSize: [2, 2], //尺寸是2X2
    strides: [2, 2], //移动步长,每隔两个像素单元进行一次卷积操作
  }),
);

// 重复上述两个层
model.add(
  tf.layers.conv2d({
    kernelSize: 5,
    filters: 16, //需要提取更多特征
    strides: 1,
    activation: "relu",
    kernelInitializer: "varianceScaling",
  }),
);
model.add(
  tf.layers.maxPool2d({
    poolSize: [2, 2],
    strides: [2, 2],
  }),
);

//flatten层用于将多维的特征数据,转换为一维的分类数据,传入dense层
model.add(tf.layers.flatten());

model.add(
  tf.layers.dense({
    units: 10, //最终输出0-9十个分类
    activation: "softmax",
    kernelInitializer: "varianceScaling",
  }),
);
训练模型
//训练参数
model.compile({
  loss: "categoricalCrossentropy", //交叉熵损失函数
  optimizer: tf.train.adam(), //优化器
  metrics: ["accuracy"], //准确度度量
});

//训练集数据
const [trainXs, trainYs] = tf.tidy(() => {
  const d = data.nextTrainBatch(1000);
  return [d.xs.reshape([1000, 28, 28, 1]), d.labels];
});

//验证集数据
const [testXs, testYs] = tf.tidy(() => {
  const d = data.nextTestBatch(200);
  return [d.xs.reshape([200, 28, 28, 1]), d.labels];
});

//训练
await model.fit(trainXs, trainYs, {
  validationData: [testXs, testYs],
  batchSize: 500,
  epochs: 50,
  callbacks: tfvis.show.fitCallbacks(
    { name: "训练效果" },
    ["loss", "val_loss", "acc", "val_acc"],
    { callbacks: ["onEpochEnd"] },
  ),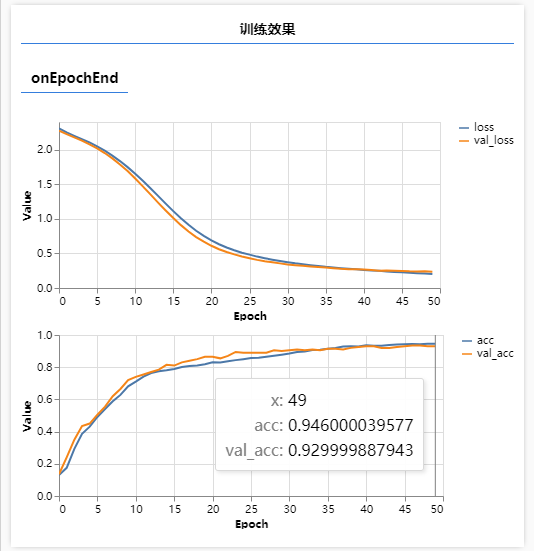
});- 训练效果:
使用模型预测识别canvas绘制数字
- html:
<script src="script.js"></script>
<canvas width="300" height="300" style="border: 2px solid #666;"></canvas>
<br>
<button onclick="window.clear();" style="margin: 4px;">清除</button>
<button onclick="window.predict();" style="margin: 4px;">预测</button>- js:
const canvas = document.querySelector("canvas");

canvas.addEventListener("mousemove", (e) => {
  if (e.buttons === 1) {
    const ctx = canvas.getContext("2d");
    ctx.fillStyle = "rgb(255,255,255)";
    ctx.fillRect(e.offsetX, e.offsetY, 25, 25);
  }
});

//黑底画板
window.clear = () => {
  const ctx = canvas.getContext("2d");
  ctx.fillStyle = "rgb(0,0,0)";
  ctx.fillRect(0, 0, 300, 300);
};

clear();- 进行预测:
window.predict = () => {
  const input = tf.tidy(() => {
    return tf.image
      .resizeBilinear(
        //转换图像tensor尺寸
        tf.browser.fromPixels(canvas), //canvas转换为tensor
        [28, 28], //转换成28*28
        true,
      )
      .slice([0, 0, 0], [28, 28, 1]) //canvas图片是彩色图片,通过slice转换为黑白图片
      .toFloat() //训练数据进行过归一化,因此预测值也要归一化
      .div(255) //归一化
      .reshape([1, 28, 28, 1]); //和神经网络第一层的输入格式统一
  });
  const pred = model.predict(input).argMax(1);
  alert(`预测结果为 ${pred.dataSync()[0]}`);
};
总结:这一节有两个难点,一是卷积神经网络的构建,重在理解图像卷积核;二是图像与tensor格式的转换,需要多加练习与斟酌;
本地训练结果正确率大概70%,可以通过增加训练集数据和训练次数来提升效果
上次更新: